How to use TattingCAD to make a new Tatting Pattern from an antique pattern
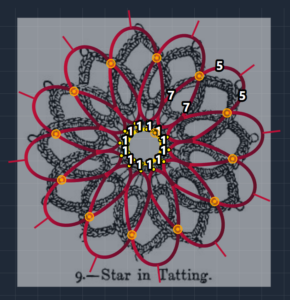
In this article I’m going to use an antique pattern from Beeton’s Book of Needlework, by Isabella Beeton – from Project Gutenberg. I will rework the tatting pattern: “9.–Star in Tatting”.
Important note: while the program has an auto save function – manual saving is the best way to preserve your work. Save your file before starting.
1) Set Up Your Workspace
- Open TattingCAD.
- From the left menu, select Reference Image and add the picture as your background.
- If you don’t have a Polar Grid, create one via Options → Polar Grid. We will build around the center point of the grid, so add a ring to the grid with default settings.
- Adjust the reference image so it is centered on the polar grid.
- Save your work via the menu or Ctrl+S.
2) Read the Written Pattern
The pattern begins with a ring:
“Work 1 double, then 1 purl and 1 double, repeated 12 times.”
This translates to 1 double stitch (DS) and 1 joinable picot (JP), repeated 12 times. In TattingCAD notation:
- Apply the notation to the ring.
- Toggle the shape in the Property Bar to make it a circle.
- Optionally, add a new material or change the color.
- In the Arrange menu, select Center to Polar Grid.
- Adjust the scale so the ring matches the reference image.
- Save your work.
3) Add the Next Ring
The next line reads:
“Work 7 double, join to the first purl of the previous round, work 7 double and draw close; reverse the work.”
This creates a ring with 7 DS, a joinable picot, and 7 DS. Notation:
r: 7ds-jp-7ds
In Arrange → Align to Grid Horizontally, place the ring above the first one.
- Activate Ortho Lock from the toolbar for precise placement.
- Adjust color, material, and shape (squeeze) if needed.
- Save your work.
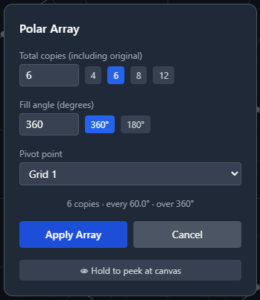
4) Create a Polar Array
Select the last ring and go to Options → Arrange → Polar Array.
For this pattern, we need 12 rings around the center:
- Total Copies: 12
- Fill Angle: 360°
- Pivot Point: your grid center
Preview using Peek at Canvas.
If satisfied, click Apply Array and save.
5) Add the Chains
The pattern says:
“Commence the scallop: 5 double, 1 purl, 5 double.”
Notation:
c: 5ds-p-5ds
Create a new chain and snap one endpoint to a petal tip.
Use the Path Edit Tool to drag the other endpoint to the next ring.
Change material/color if desired.
Adjust the path using the handlebars.
Repeat with Polar Array to complete the rest of the chains.
Save your work.
6) Connect the Joinable Picots
- Select the Joint Picot Tool (Shift+J).
- Click the first picot (center ring) then the second picot (closest ring) to connect.
- Click Join or press J.
- Repeat for all 12 joinable picots.
- Exit picot mode with ESC or the property bar button.
7) Assign Tatting Order
- Open View → Tatting Order.
- Create two rounds: Round 1 and Round 2.
- Assign Round 1 to the first ring and Round 2 to the petals.
- Use the Assign Next Number button to quickly number the elements.
- Mark RW (Reverse Work) for elements that require flipping according to the pattern.
- Save frequently.
Note: A future version will simplify this process.
8) Export the Written Pattern
- Go to File → Output Notation to Clipboard.
- After the green confirmation message, open any text editor and paste the pattern.
- Edit as needed to clean up unnumbered elements or formatting.
- You can also save realistic renders or export SVG format for sharing your patterns.
Final Thoughts
This may feel like a lot at first, but with practice, the process becomes quick and intuitive. If you have questions, don’t hesitate to ask!
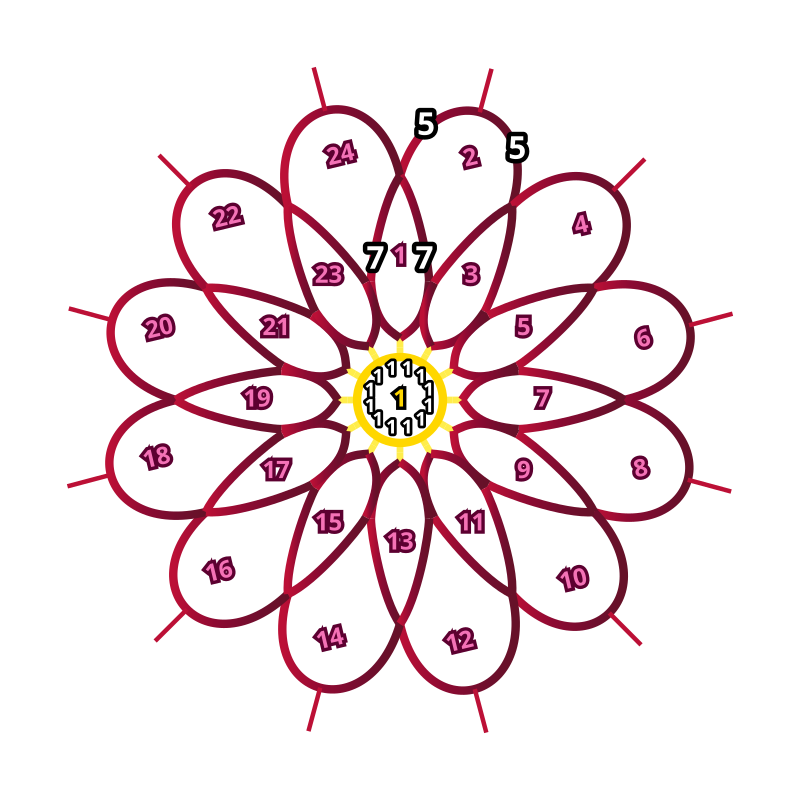
And the finished pattern is:
=== Round 1 ===
1. r: 11*(1ds-jp)-1ds-Mock Picot
=== Round 2 ===
Repeat:
1. r: 7ds-jp//r1-Round 1//-7ds RW
2. c: 5ds-p-5ds RW
--- Thread Estimate (Pearl Cotton Size 10, Needle Tat) ---
(tie-ins and tails not included)
Material 1 ~ 0.06 m
Default ~ 4.25 m
Note: core thread not included — add manually (multi-material pattern)
Core thread ~ 0.65 m
DS: 288 SS: 0 Picots: 12 Joined: 12