
What to Do with Unused Tatted Motifs
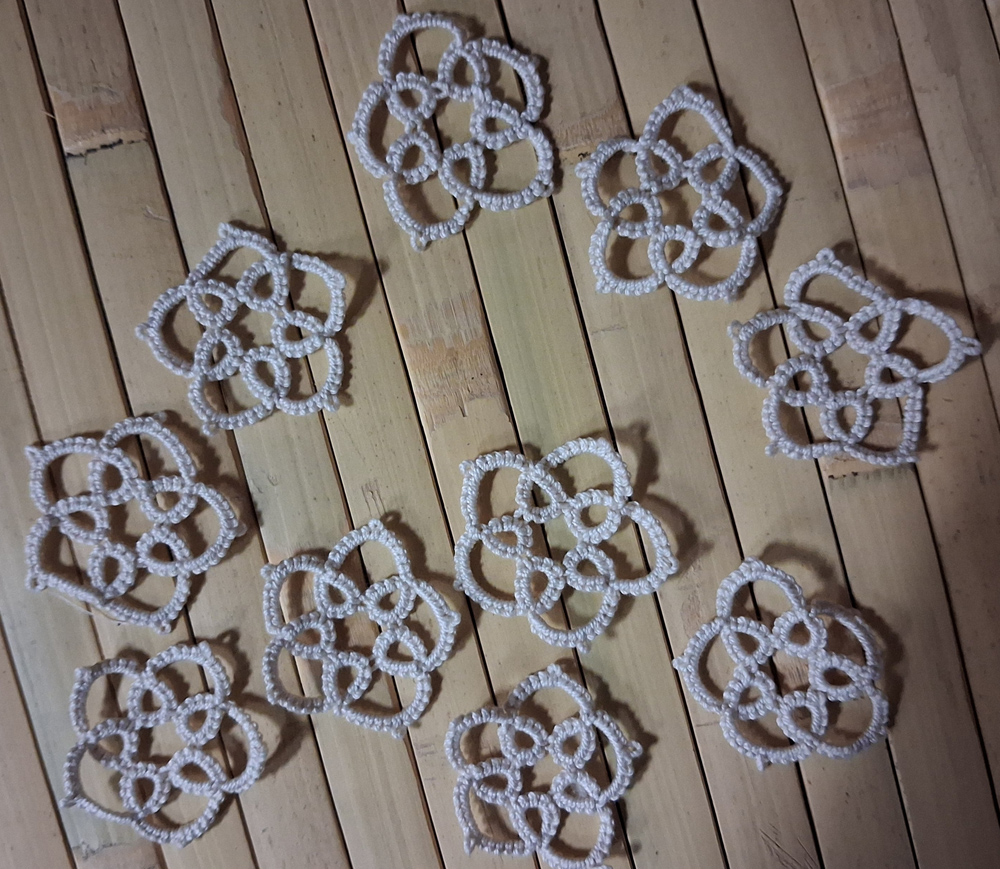 I had over a dozen five-petal motifs left over from another project. I couldn’t find a good use for them as standalone pieces. I even considered turning them into “Easter egg” decorations—despite the fact that I don’t usually decorate for Easter.
I dislike waste, so I decided to repurpose them. The solution was to incorporate the motifs into a bookmark (or potentially a bracelet).
How to Turn Motifs into a New Pattern
I started by recreating the small motifs in TattingCAD. Because of their awkward five-sided shape—which isn’t the easiest to work with—I began by connecting two motifs together.
Since these were already finished standalone motifs, I couldn’t approach them the same way as organically developed patterns, where picots are joined during construction. Instead, the existing picots had to be connected using a separate thread.
After joining two motifs, I duplicated the pair and mirrored them to explore how the double motifs could connect. This made the design both mirrorable and tileable.
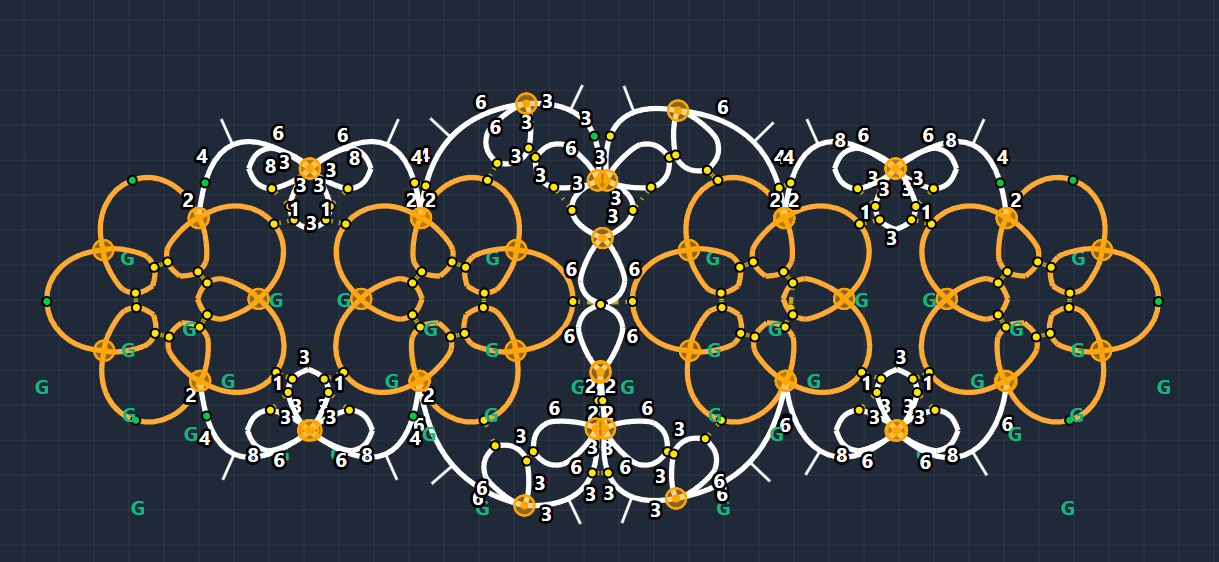
Once the central join is established, the pattern can theoretically be extended into a runner or edging. Interestingly, when connected on only one side, the piece curls slightly—I think this effect could be developed further into a necklace design with additional refinement.
What Does the TattingCAD Workflow Look Like?
To be honest, the program isn’t perfect. Some limitations would require significant resources to fix. One example is how knot tension is simulated: in reality, knots tend to be tighter at the ends and looser in the middle, but this isn’t fully reflected in the software.
Because of this, early joins in a chain or ring may appear slightly offset. This is where practical tatting experience becomes important, rather than relying entirely on the simplified digital representation.
That said, for design work, TattingCAD performs very well. Even though the pattern became a bit complex in terms of counting, I didn’t need to redo anything while tatting it for the first time. On the second attempt, I was able to refine the design immediately.
In the end, I created my bookmarks with minimal frustration. TattingCAD removes much of the guesswork from the design process.
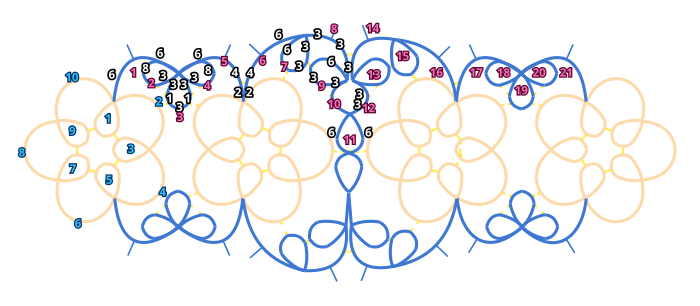
And the pattern just to have it, the Five Petal Bookmark:
5-petal motif:

1. r: 4ds-jp//r3/Round1//-3ds-jp//r9/Round1//-4ds RW

2. c: 6ds-jp-6ds RW

3. r: 4ds-jp//r5/Round1//-3ds-jp//r1/Round1//-4ds RW

4. c: 6ds-jp-6ds RW

5. r: 4ds-jp//r7/Round1//-3ds-jp//r3/Round1//-4ds RW

6. c: 6ds-jp-6ds RW

7. r: 4ds-jp//r9/Round1//-3ds-jp//r5/Round1//-4ds RW

8. c: 6ds-jp-6ds RW

9. r: 4ds-jp//r1/Round1//-3ds-jp//r7/Round1//-4ds RW

10. c: 6ds-jp-6ds RW
Connecting pattern:

1. c: 6ds-p-6ds RW

2. r: 3ds-jp//r3/Round2//-8ds

3. r: 3ds-jp//r4/Round2//-1ds-jp//ch?//-3ds-jp//ch2/Round1//-1ds-jp//r2/Round2//-3ds

4. r: 8ds-jp//r3/Round2//-3ds RW

5. c: 6ds-p-4ds-jp//ch6/Round2//-2ds RW

6. c: 2ds-jp//ch5/Round2//-4ds-p-6ds RW

7. r: 3ds-jp//r9/Round2//-3ds-jp//ch?//-6ds RW

8. c: 3ds-p-3ds-jp//ch14//-3ds RW

9. r: 3ds-jp//ch10/Round2//-3ds-jp//r7/Round2//-6ds

10. c: 3ds-jp//r9/Round2//-3ds

11. r: 6ds-jp//ch?//r?//-6ds

12. c: 3ds-jp//r13//-3ds

13. r: 6ds-jp//r15//-3ds-jp//ch12//-3ds RW

14. c: 3ds-jp//ch8/Round2//-3ds-p-3ds RW

15. r: 6ds-jp//ch?//-3ds-jp//r13//-3ds RW

16. c: 6ds-p-4ds-jp//ch17//-2ds RW

17. c: 2ds-jp//ch16//-4ds-p-6ds RW

18. r: 3ds-jp//r19//-8ds

19. r: 3ds-jp//r20//-1ds-jp//ch?//-3ds-jp//ch?//-1ds-jp//r18//-3ds

20. r: 8ds-jp//r19//-3ds RW

21. c: 6ds-p-6ds

You can make it a runner by repeating 1-16 steps. The first step joined to the 16. step